Screening is the start of the training process. You can’t jump straight into a programme without knowing the base foundations that are already in place. Hopefully the foundations are strong and sturdy, more than likely there will be a slight imbalance somewhere, a tight muscle here, a weak muscle there. This in turn will effect the next link along the chain because the body doesn’t work in sections, independently from each other, they work in harmony to create the easiest way for you to move with the least resistance. However, when imbalances occur, they can lead to sprains and strains in other areas, as your body tries to create the path of least resistance for you to keep moving. For example if you have weak glutes, then your quads, adductors, erector spinae and hamstrings will try to compensate, leading to overwork of these muscles, aka altered biomechanics. Biomechanics means how forces interact within a living body.
Download Wellness Form
The start of the journey begins with you telling me all about yourself, from here we can start to build a picture of where you are at and why. So don’t be shy, I want to know about the 5 packets you smoke and the gallon of Jack you swill each week.
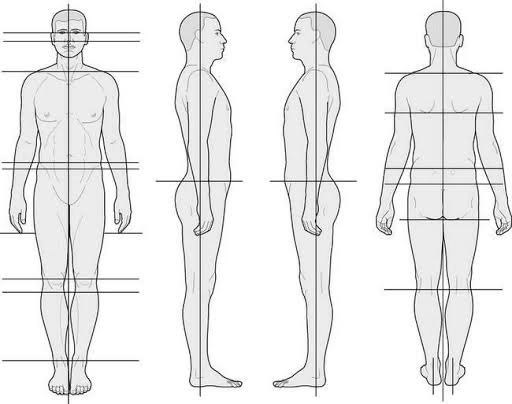
Step 2 – Postural Assessment
Postural assessment has been a tool used by clinicians across the ages. A static posture is how an individual presents themselves standing still, showing the alignment of the body. Therefore, you will take full length pictures of yourself standing straight on, profile and posteriorly. Ideally, if you feel comfortable to do so, take the pictures in just shorts for men and shorts and sports bra for women, this is to allow me to see how your body holds itself off your axis (spine, ribs and pelvis). Please look at the example pictures below as a guide.
Step 3 – Movement Assessment
Overhead Squat Movement assessments are the cornerstone of a comprehensive and integrated assessment process. Movement represents the integrated functioning of many systems within the body, primarily the muscular, skeletal and nervous systems. This will highlight your movement pattern and highlight your length-tension relationship of each muscle around each joint. The overhead squat is a reliable and valid measure. Please watch the videos below to fully understand the procedure. As with the postural assessment, please take front on, profile and posterior video clips.
Step 4 – Single Leg Squat
This is a transitional movement assessment assess dynamic flexibility, core strength, balance, and overall neuromuscular control. It basically exaggerates alter length-tension relationships seen in the lower extremity and core from the overhead squat assessment. Therefore, confirming to the practitioner/me that what they saw was in fact correct. Please view the videos below for the correct procedure. This time you only need to film front and and posteriorly.
Step 5 – Landing Error Scoring System Test (LESS Test)
This simply highlights how you land after you jump from a height of 30cm/12inches. We want this as most sporting movements require you to run or land on your feet. This test will show how your foot touches the ground, demonstrating how you would run, twist and turn in a math scenario. Please view the video below for the exact procedure.
Step 6 – Strength Performance Testing
Now we are getting into the nitty and gritty. This is now the part where we find out what you’re made of. We are testing your strength endurance and if it applies to you, your one repetition maximum (1RM) for selected exercises. This will highlight how strong you are and whether there are any imbalances between muscle groups. You may have excellent control of your body which did not get highlighted in the previous steps, however, this will definitely highlight them. These tests also report what stage you are in your training, whether you are so strong that you could compete in the worlds strongest man and therefore we need to focus on other aspects, or whether you wilt after 2 reps and show you’re soft as butter and we need to get you stronger. Below is a table for you to fill out, depending on your goals, you will only compete the ones that are appropriate for you. Please view the videos below of the exercises that apply to you.
Step 7 – Cardio Performance
Testing Very similar to step 6, whether you perform this test or not will depend on your goals. However, it is good to know how fit you are. Not the most pleasant of test as it requires you to push hard. There are varying tests under this umbrella from a functional threshold power test (FTP) to a six-minute walk test. Please view the video that I have identified for you.
These tests are also a great way to see how you are progressing. Performed every 4-6 weeks, we can monitor how the training to effecting you. The can be a great motivator, so please do not fear them, no judgements are made. I implement them with everybody, including myself, much to my athletes delight.